The WP Job Manager Add-On for WP All Import makes it easy to bulk import your job listings to the WP Job Manager plugin.
Install following extensions:
Tutorial:
Search through our knowledge base or submit a ticket to get answers 🙂
The WP Job Manager Add-On for WP All Import makes it easy to bulk import your job listings to the WP Job Manager plugin.
Install following extensions:
Tutorial:
With Workscout and Go Fetch jobs plugin you can easily import jobs from the most popular job sites and/or job aggregators. This handy plugin fetches jobs from RSS feeds and imports them to your jobs database. Pick your favorite job site/job directory, look for the jobs RSS feed, paste it directly to Go Fetch Jobs and instantly get fresh jobs in your database!
To help you quickly getting fresh jobs from external sites, Go Fetch Jobs comes bundled with ready to use RSS feeds and detailed instructions on how to setup RSS feeds for job sites that provide them.
The UI is simple and provides tips and descriptions about each option and how it works.

To help you quickly getting jobs from external sites, Go Fetch Jobs comes bundled with ready to use RSS feeds and detailed instructions on how to setup RSS feeds for job sites that provide them, including big sites like jobs.theguardian.com. An RSS builder is also provided for providers that allow customizing the RSS feed.

You can also use custom RSS URL, here’s an example for indeed: https://www.indeed.nl/rss?q=keyword1%2Ckeyword2&l=location1%2Clocation2&limit=50
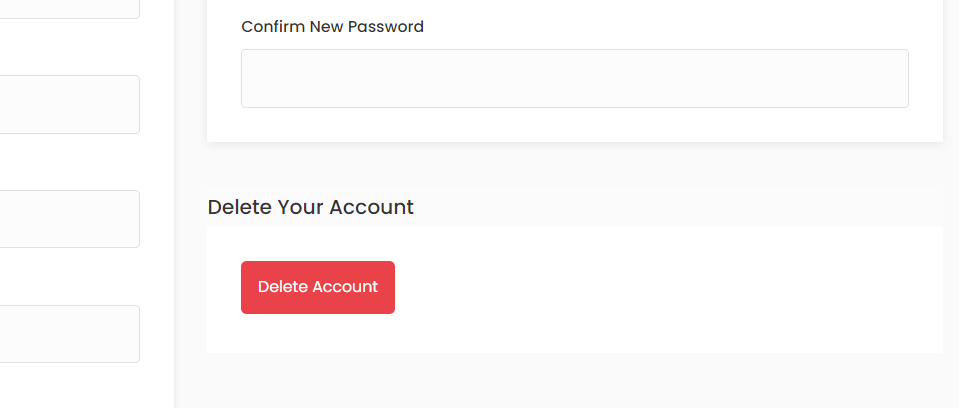
Install this plugin https://wordpress.org/plugins/delete-me/ and in Settings → Delete Me enable user roles that will be able to delete their account. “Delete” button will automatically show in My Profile page
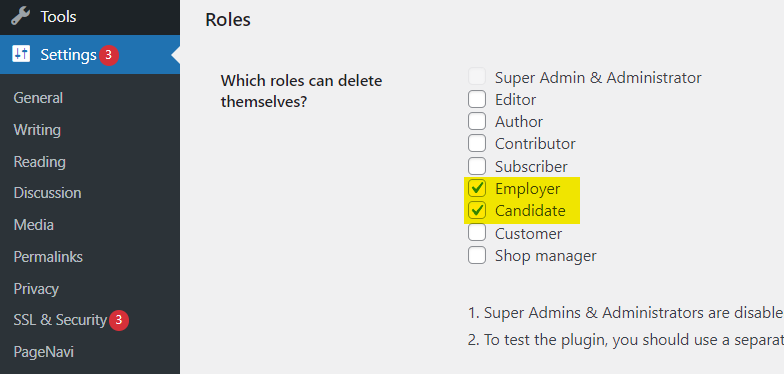
If you’d like to disable one of the mentioned user role head over to WorkScout Core → Registration → Hide role field in Registration field
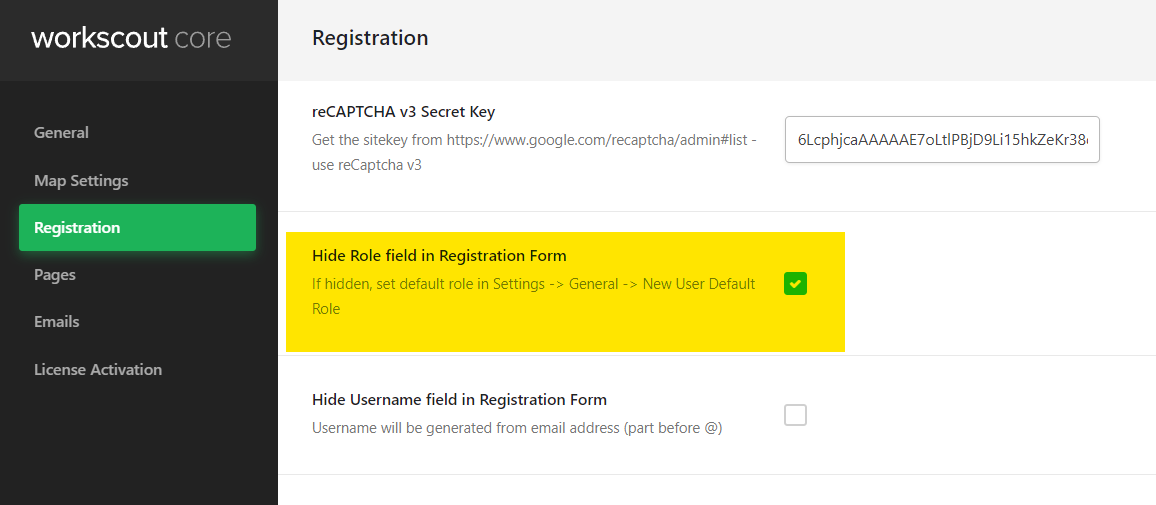
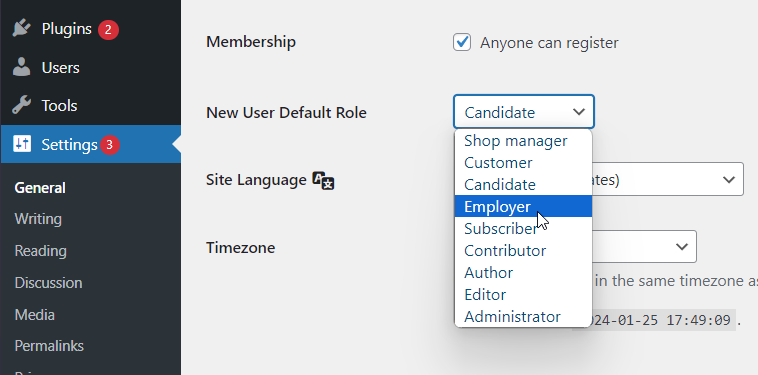
Then set default role in Settings → General → New User Default Role
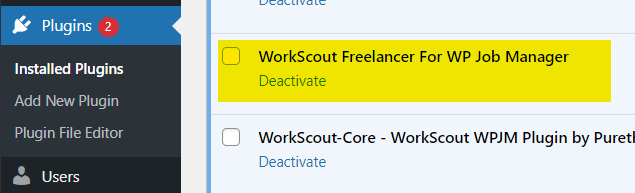
You can disable freelance marketplace feature (tasks/bids) by disabling WorkScout Freelancer plugin:
This will remove all functionalities related to marketplace including “Wallet”, “My Bids” and “My Projects” pages in dashboard.
You can disable companies profiles simply by disabling following plugins:

If you’re experiencing issues during logging in in and you get stuck on message ‘Sending user info, please wait…‘ there might be couple of issues:
fastcgi_temp_file_write_size 10m;
fastcgi_busy_buffers_size 512k;
fastcgi_buffer_size 512k;
fastcgi_buffers 16 512k;
client_max_body_size 50m;
proxy_buffer_size 16k;
proxy_busy_buffers_size 16k;
if that won’t help, check if you have Nginx Content caching enabled, you might need to disable that to fix that problem
This is a very basic WordPress setting. Simply head over to the Settings → General page in your WordPress admin area. Scroll down to the ‘Membership’ section and check the box next to the ‘Anyone can register’ option.

If you caching enabled on your website you’d need to flush cache aswell.
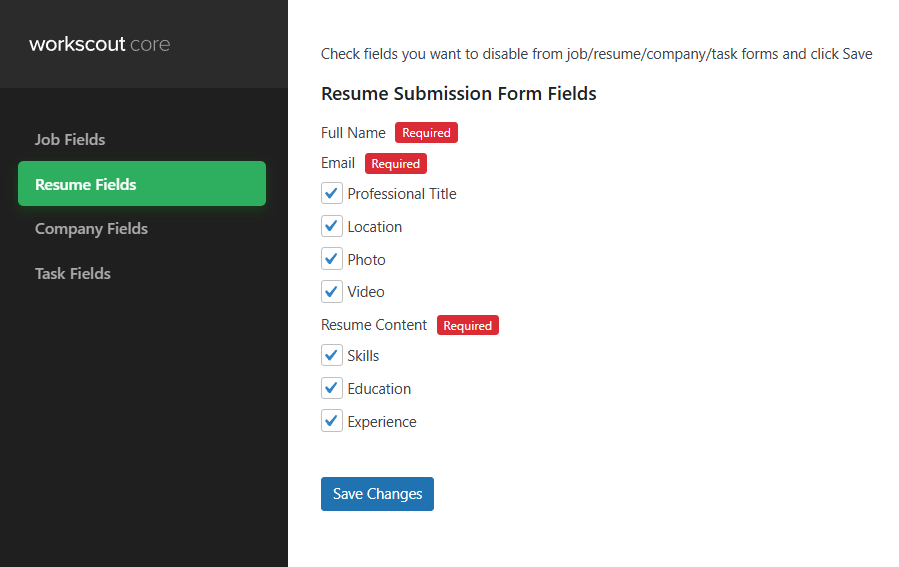
Basic changes can be done in WorkScout Core → Form Fields Visibility → Resume Fields where you can enable or disable fields you want in resume submit form.
For text changes from english to english use plugin such as the Say What Plugin. If you’d like to translate fields to other language than english please refer to article: Translating theme and plugins →
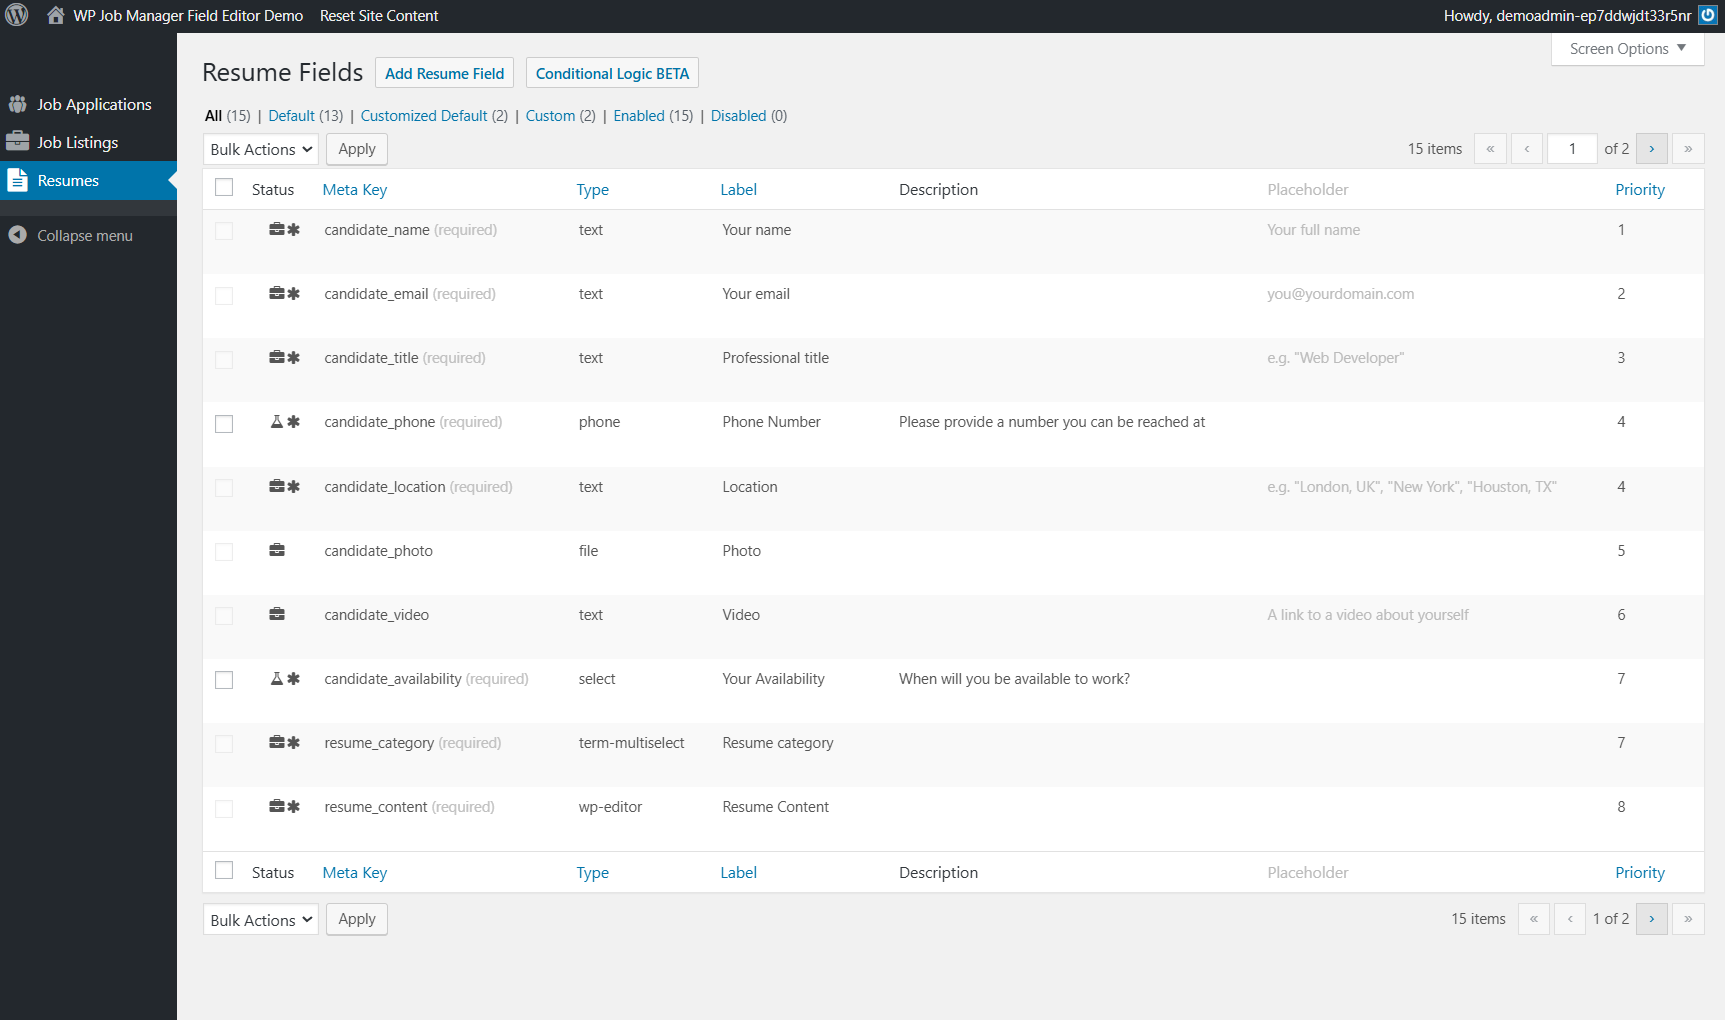
Use a 3rd party plugin such as https://plugins.smyl.es/wp-job-manager-field-editor/ which has a UI for field editing.
Editing resume submission fields is possible via the submit_resume_form_fields filter. Adding some code will allow you to edit various fields, or add new ones.
See the below example which demonstrates how to change a field’s label:
// Add your own function to filter the fields
add_filter( 'submit_resume_form_fields', 'custom_submit_resume_form_fields' );

// This is your function which takes the fields, modifies them, and returns them
function custom_submit_resume_form_fields( $fields ) {

// Here we target one of the job fields (candidate name) and change it's label
$fields['resume_fields']['candidate_name']['label'] = "The Candidate Name";

// And return the modified fields
return $fields;
}
Similarly, you can add a field just as easily. Here’s an example showing how to add a new text input to the form:
// Add field to admin
add_filter( 'resume_manager_resume_fields', 'wpjms_admin_resume_form_fields' );
function wpjms_admin_resume_form_fields( $fields ) {

$fields['_candidate_color'] = array(
'label' => __( 'Favourite Color', 'job_manager' ),
'type' => 'text',
'placeholder' => __( 'Blue', 'job_manager' ),
'description' => '',
'priority' => 1
);

return $fields;

}

// Add field to frontend
add_filter( 'submit_resume_form_fields', 'wpjms_frontend_resume_form_fields' );
function wpjms_frontend_resume_form_fields( $fields ) {

$fields['resume_fields']['candidate_color'] = array(
'label' => __( 'Favourite Color', 'job_manager' ),
'type' => 'text',
'required' => true,
'placeholder' => '',
'priority' => 1
);

return $fields;

}

// Add a line to the notifcation email with custom field
add_filter( 'apply_with_resume_email_message', 'wpjms_color_field_email_message', 10, 2 );
function wpjms_color_field_email_message( $message, $resume_id ) {
$message[] = "n" . "Favourite Color: " . get_post_meta( $resume_id, '_candidate_color', true );
return $message;
}
Note: You can change the ‘priority’ of the field to position it where you want it. The higher the number, the lower down the form it will appear.
You could use a different field type like select or checkbox, just make sure to follow the same method to add those field types that WP Job Manager uses.
Note: To add it to the preview field you’d want to look at adding it to the template files, like content-single-resume.php, with some code like:
<? php echo get_post_meta( $post->ID, '_candidate_color', true ); ?>
A common request is to require a resume file to be added. Simply use the following code to make it so:
// Add your own function to filter the fields
add_filter( 'submit_resume_form_fields', 'resume_file_required' );

// This is your function which takes the fields, modifies them, and returns them
function resume_file_required( $fields ) {

// Here we target one of the job fields (candidate name) and change it's label
$fields['resume_fields']['resume_file']['required'] = true;

// And return the modified fields
return $fields;
}
To add a field to one of the resume’s repeated sections (Education, Experience), the process is almost the same as adding a single field. Here’s an example of adding a “Favorite Teacher” field to each Education section.
Note that we use the 'resume_manager_resume_education_fields' filter instead of 'resume_manager_resume_fields'.
It’s also important to include a 'name' entry as shown:
// Add field to admin
add_filter( 'resume_manager_resume_education_fields', 'wpjms_admin_resume_form_fields' );
function wpjms_admin_resume_form_fields( $fields ) {

$fields['favorite_teacher'] = array(
'label' => __( 'Favourite Teacher', 'job_manager' ),
'name' => 'resume_education_teacher[]',
'type' => 'text',
'placeholder' => '',
'description' => '',
'priority' => 1
);

return $fields;

}
This code is almost the same as adding a single field to the form, you just need to include ['candidate_education']['fields'] to specify where this field should go.
// Add field to frontend
add_filter( 'submit_resume_form_fields', 'wpjms_frontend_resume_form_fields' );
function wpjms_frontend_resume_form_fields( $fields ) {

	$fields['resume_fields']['candidate_education']['fields']['favorite_teacher'] = array(
	    'label' => __( 'Favourite Teacher', 'job_manager' ),
	    'type' => 'text',
	    'required' => true,
	    'placeholder' => '',
	    'priority' => 1
	);

	return $fields;

}
You may want to simplify the job submission process by removing the preview step.
To do so, simply add the following code to your functions.php file or even better, use a plugin such as Code Snippets
<?php

/**
* Remove the preview step. Code goes in theme functions.php or custom plugin.
* @param array $steps
* @return array
*/
function custom_submit_job_steps( $steps ) {
unset( $steps['preview'] );
return $steps;
}
add_filter( 'submit_job_steps', 'custom_submit_job_steps' );

/**
* Change button text (won't work until v1.16.2)
*/
function change_preview_text() {
return __( 'Submit Job' );
}
add_filter( 'submit_job_form_submit_button_text', 'change_preview_text' );

/**
* Since we removed the preview step and it's handler, we need to manually publish jobs
* @param int $job_id
*/
function done_publish_job( $job_id ) {
$job = get_post( $job_id );

if ( in_array( $job->post_status, array( 'preview', 'expired' ) ) ) {
// Reset expirey
delete_post_meta( $job->ID, '_job_expires' );

// Update job listing
$update_job = array();
$update_job['ID'] = $job->ID;
$update_job['post_status'] = get_option( 'job_manager_submission_requires_approval' ) ? 'pending' : 'publish';
$update_job['post_date'] = current_time( 'mysql' );
$update_job['post_date_gmt'] = current_time( 'mysql', 1 );
wp_update_post( $update_job );
}
}
add_action( 'job_manager_job_submitted', 'done_publish_job' );
You may need to remove the first line from the code.
Basically this does a few things:
