Trizzy WP Documentation
Thank you for purchasing my theme. If you have any questions that are beyond the scope of this help file, please feel free to email via my user page contact form here or submit ticket on support.purethemes.net . Thanks so much!
| Author: | Purethemes |
| Created: | 26 August 14 |
| Modified: | 24 August 14 |
| Current Version: | 1.0 |
| Documentation Version | 1.0 |
This documentation in latest version is always available on docs.purethemes.net/trizzy
Getting started
I assume you have your own WordPress installation, so let's get started!
Installation
You can do it in two ways:
-
FTP Upload:
- Unzip the “trizzy.zip”
- Open up your FTP manager and connect to your hosting
- Browse to wp-content/themes
- Upload the trizzy theme folder.
- Log Into WordPress and go to Appearance - Themes
- Find the Trizzy and click activate
-
WordPress Upload
-
Download the “Installable WordPress file only” you'll find it here

- Navigate to Appearance Add New Themes Upload.
- Follow the instructions on the screen, select the downloaded theme folder (“trizzy-theme.zip”).
- Hit Install Now and the theme will be uploaded and installed.
-
Once the theme is uploaded, you need to activate it. Go to Appearance Themes and activate Trizzy.
Plugins installation - step I
If installation was successful, you'll see a notice about required plugins for Trizzy, to proceed click "Begin installing plugins"

Plugins installation - step II
You'll see a list of plugins, select all and choose Install, if everything will go OK, you'll be moved to the Plugins menu in wp-admin, all new plugins should be activated
It might happen that you'll encounter error, in that case install plugins one by one.
The most important plugins are Revolution Slider and WPBakery Visual Composer. MailChimp Widget is needed for a newsletter widget, and WooCommerce is needed if you wish to setup shop
If you installed required plugins and don't need anything else, just click Dismiss this notice

Activating Theme Options
After activating the theme, you will notice under Appearance menu new sub-menu Theme Options. You'll find there Theme Options Panel, from where you can do a lot of cool stuff. Every section of Theme Options Panel will be described later.

Now open this Options Panel and hit Save button - it will set some options for the start.
Importing Demo Content
If you want to have the same content on your website as Live Preview of Trizzy theme, you'll need to import demo content. To do that please go to Tools Import WordPress, install plugin you'll see and than select file "extras/import.xml".
You'll find it in "All files & documentation"
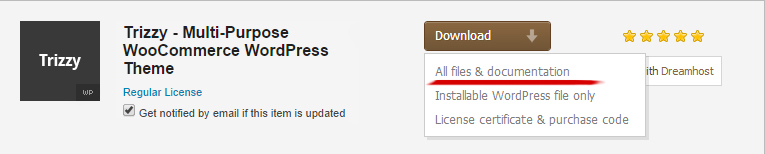
Just download and extract this file, you'll find the "extras" inside
If you don't want to import whole data, in "extras/layouts" you'll find txt files with code from Live Preview. You can choose for example home.txt, copy whole content of that file, than create new home page on your WordPress, paste it in Text view (the right top tab over Post/page Editor), and start working on your page based on this layout.
Notice All photos included with import file are just plain gray color, as they are copyrighted files purchased on PhotoDune. If you want to use them, list of links is at the end of this documentation.
If your import was successful, please go to Appearance Menus and in Manage Locations and for 'Primary Menu' choose "Menu", than save.
Setting up the static homepage
If you have imported content from demo, you can skip that paragraph and go straight to number 2.
First you have to create a basic page, and select page template named "Home Page Template". Now you can fill it with your content and publish. Next, create another basic page with no content and default template, name it Blog (you can use different names).Go to Settings Reading and in the Front page displays choose A static page, then select page named Home.
For blog page you can select your page named Blog. Click Save Changes

Next, you should setup your permalinks to look pretty. You can go to Settings Permalinks, choose the Custom Structure, and use this: /%category%/%postname%/
Revolution Slider
You can find Revolution Slider at the bottom of the WordPress Menu.
After pressing the Create New Slider button you will see a form where you are need to enter a Slider Title and a Slider Alias (a slug that is used to display the Slider in this theme, try to keep it simple, no spaces and special chars). Set all the setting like on image below.

Detailed instruction from RevoSlider is available in extras and also online Visual Composer KnowledgeBase
It's possible to import sliders from demo, you'll also find them in extras
Slides
The next step is creating/editing slides. You get there by just clicking on Edit Slides in the Slider Form window.
Just press "New Slide" and the native WP Media Upload dialog window will appear. Choose or Upload the slide's background image, choose "Full Size" and then "Insert Into Post"
Use the arrow handles on the right side to change the slides position in the slider (top to bottom = first to last slide to be shown) or delete it with the "Delete" button.
The "Edit Slide" leads you to the next chapter "Slide".

Slide & Layers
In the Edit Slide view you see the heart of our plugin. The drag&drop Caption editor.
But first please note that you have another chance here to change the background image with the "Change Image" button.
To create a Layer (Caption, Image or Video) press the button "Add Layer" or "Add Layer: Image". In case of a text layer a basic layer will be created you can use the "Text" field in the Layer Params to change the caption on it. The "Style" selectbox shows some basic styles (CSS classes) you can use to style the caption (you can always add own CSS classes to this field or edit the existing ones via the "Edit CSS File").
In case of an Image Layer you will see the native WP Media Uploader again. In case of a Video Layer you will prompted to a custom Video selection wizard.
You now can move the Layers around via drag&drop or type in the x and y coordinate in the corresponding fields.
The "Layers Sorting" drag&drop list determines the Layers' z-index. This list specifies the stack order of an element.
An element with greater stack order is always in front of an element with a lower stack order.

Whole documentation for Revolution Slider can be found in extras/revodocs/ I strongly advise to read it ;) And each slide from demo of Trizzy can be imported, you'll find them in extras but they don't include images as those are copyrighted
Setting up the basic menu
This theme uses WordPress 3.0 Custom Menus. Go to Appearance > Menus and you will see a panel where you can create new menus. Create one, add your created pages to it(from the left side panels) and save it. After this, go to tab Manage Locations where you can select the Menu from dropdown box . Choose your newly created menu, click Save and your menu is ready.

Setting up the MEGAmenu

Here's the code for shortcodes used in menu in Trizzy demo
[image_caption_box image="http://trizzy.purethemes.wpengine.com/files/2014/08/menu-banner-01.jpg" title="Jeans" subtitle="An Example Subline" url="#" width="ignore"]

[image_caption_box image="http://trizzy.purethemes.wpengine.com/files/2014/08/menu-banner-02.jpg" title="Sunglasses" subtitle="Add Anything Here" url="#/" width="ignore" ]
Creating Content Post, Pages and Portfolios
Post
Creating posts is nothing special if you have even basic experience with WordPress. Trizzy theme offers couple of additional options in Post editor.

Post types
Trizzy support 5 types of posts. You can change them in right side box. Default is Standard - that one shows only text of post. Image type shows thumbs if it has any Featured Image added. The Video post will display video if you'll fill Video URL option, and Gallery type will display gallery you've created in post. Each change will show a form with options to fill.
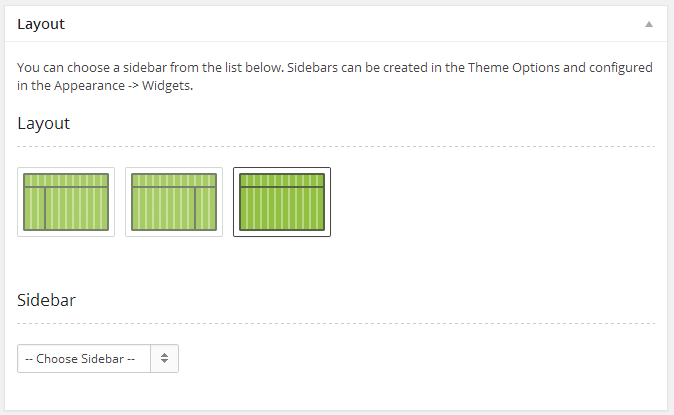
Below Editor you'll see Layout box and Post options box.

Layout box
Layout box gives you ability to select sidebar to display with post or page, and also select layout of post - you can put sidebar on left or right side, or just show full-width content. Right side is default.
You can create more sidebars in Theme Options in Sidebars section. Just follow instruction there.
If you want to use shortcodes in post content, you need to write the excerpt or you might see non parsed shortcodes in search results or in front page. The same applies if you want to use Page Builder.
Pages
Layout box
Layout box gives you ability to select sidebar to display with post or page, and also select layout of post - you can put sidebar on left or right side, or just show full-width content. Right side is default.
You can create more sidebars in Theme Options in Sidebars section. Just follow instruction there.

Portfolio Template Options
This options apply only if page uses one of Page Template from this list:
- Creative page Template
- Portfolio page 3 colums
- Portfolio page 4 colums
- Portfolio page dynamic grid
Filters to display Instead of showing all filters at once, you can select which one to display on current page, which will allow you to create many portfolios with different content.
Filters button you can hide it if you don't want to show filters. If you've selected just one filter, it won't be visible.
The Title is a field where you can overwrite default title of Portfolio section

Slider
This options apply only if page uses one of Page Template from this list:
- Page with Revolution Slider
- Creative page Template
If the template is used, you'll able here to select which slider should be displayed. It allows you to create pages with custom sliders.
Parallax Header

Parallax Header
You can set for each page or product Parallax header, or hide whole titlebar. If you want to enable Parallax header you need to upload file that is at lest 1290px wide (the wider the better) and at least 200px high. You can set opacity and color of overlay over that image to make text more visible
Slider
This options apply only if page uses one of Page Template from this list:
- Page with Revolution Slider
- Creative page Template
If the template is used, you'll able here to select which slider should be displayed. It allows you to create pages with custom sliders.
List of page templates:
| Template name | Description |
|---|---|
| Home page | Full width page with slider selected in Theme Options |
| Portfolio page 3 columns | Page to list portfolio items in 3 columns |
| Portfolio page 4 columns | Page to list portfolio items in 4 columns |
| Page Template with Revolution Slider | Page with Revolution Slider |
| Portfolio page dynamic grid | Page to list portfolio items as dynamic grid |
| Contact page | Page to list portfolio items as dynamic grid |
| Creative page Template | RevoSlider + Dynamic Grid |
Portfolio
Portfolio is similar to posts. You can create portfolio item which will feature gallery of your images, or video clip. Create Gallery the same way you do it in posts (reminder: screencast is here, and don't forget to set Featured Image.
You can create portfolio item in two types - Wide and "Half wide". In first case, slider takes all available space, which means that ideally images for portfolio should be 1180px wide, smaller images won't look good as they will be strechted. If you wish to use only "Half wide" the images needs to be 775px wide. The height of images is not important as slider will adjust for each image.
WordPress will try to resize images you're uploading, that may result in not the results you want. If you'll notice that, the best option for you is to prepare images in exactly the size you want.
Now you have couple of custom options. First you can put subtitle to the Item name.
You can also switch gallery to Video, then just paste URL to the clip and it will be displayed in place of gallery slider. List of supported sites is here http://codex.wordpress.org/Embeds
You're free to use any shortcodes or other elements in a Portfolio content, just remember that if you're using "half" layout the content wide is just "five" columns.

Portfolio Options
Portfolio Type Video or gallery. If you select Video, you need to either put URL to video in field below or get embed code.
Portfolio layout If "wide" is selected the gallery will take all available space, if "half" is selected the gallery will take only 11 columns.
Gallery Slider the same gallery editor as for posts.
Link to video paste URL to the clip and it will be displayed in place of gallery slider. List of supported sites is here http://codex.wordpress.org/Embeds
Embed code for Video if your service doesn't support oEmbed, you need to paste here whole embed code (probably starts with "object" tags)
Portfolio filters
Filters acts like categories - you can add one portfolio item to many filters.

Page Builder

Page Builder in Trizzy is based on Showbiz Visual Composer: Page Builder for WordPress
It's extended by 22 new blocks designed for Trizzy, that allows you even more flexibility in creating your website
Create your own webpage in less then 10 minutes with Visual Composer page builder for WordPress from Michael on Vimeo.
Watch it in fullscreen
Plugins Configuration
Here's some short info about basic plugins you can and need to use in Trizzy.
MailChimp Widget
If you're using MailChimp for sending mailings, you can get subscribers by using official MailChimp Widget plugin that is nicely styled for Trizzy.
WooCommerce Optional plugin
After installing WooCommerce, be sure to go WooCommerce - Settings and uncheck option "Enable WooCommerce CSS styles". Trizzy has full support for WooCommerce, with nicely styled templates matching theme design
WP-PageNavi Optional plugin
After installing, go to Settings - PageNavi, and be sure to have checked "Use pagenavi-css.css". This will replace standard "next/prev" page buttons with pagination list.
YITH WooCommerce WishlistOptional plugin
If you want to add wishlist functionality to your shop, this plugin is the one you need ;)
WPML compatibility!
Trizzy is fully compatible with WPML, which means you can create multilingual versions of your site.
You need to install two plugins from WPML - WPML Multilingual CMS and WPML String Translation. You'll find extensive documentation about using WPML plugin here http://wpml.org/documentation/getting-started-guide/, but you need to know two things about Trizzy to fully translate it.
Except post pages and other content that is editable from wp-admin, theme has also couple of text string which are "hardcoded" in theme files. Good news, you can translate them also! You just need to go to wp-admin -> WPML -> String Translation, and find the strings you need to translate.
Shortcodes & Widgets Configuration
Trizzy has many shortcodes which will help you to build awesome layouts. In "extras" folder you have sample layouts saved as text files, so you can just copy them to your Editor and use them as a base for your site.
Here is list of all shortcodes:
Space shortcode:
[space class="margin-top-30"]
This works like [clear] shortcode but allows you to add custom class, for example to make some whitespace. There are couple class available, margin-top-xx, margin-bottom-xx where xx can be number 0,10,15,20,25,30,35,40,45 or 50
Clear shortcode:
[clear]
Empty div with clearfix, use after floated elements
Dropcap shortcode:
[dropcap type=""] A[/dropcap]
Make first letter of paragraph larger than the rest of the text. As "type" you can use also 'full'.
Headline shortcodes:
[headline margintop="0" marginbottom="30" clearfix="1"] Text [headline]

This will create H tag styled for nice start of paragraph. You can add top and bottom margin to it.
Icon shortcodes:
[icon icon=""]
This will add one of icons from Font Awesome pack
Highlight shortcodes:
[highlight style=""] text [highlight]

This will highlight wrapped text.
Options- style "color" (default), "gray", "light"
Iconbox
[iconbox title="Easy to Customize" link="" icon="icon-bullhorn"]Proin iaculis purus consequat sem cursus digni ssim. Donec porttitor entume suscipit. Aenean rhoncus posuere odio in tincidunt.[/iconbox]
Iconbox is designed to create features lists of your products.
Options- title - required field
- link - where user will be moved after clicking box
- icon - FontAwesome icon
Recent work

[recent_work per_page="12" orderby="date" order="DESC" filters="" exclude_posts="" include_posts="12,54,8"]
This shortcode will display scrollable list of items from Portfolio, you can get them from specific filters or change order of display.
Options- limit - how many items to display
- orderby - none | ID | author | title | name | date | modified | parent | rand | comment_count
- order - ASC | DESC
- filters - put names of filters separated by comma to display items only from those filters
- exclude_posts - put ID's of portfolio items, separated by comma to exclude them from list
- include_posts - put ID's of portfolio items, separated by comma to include them in the list, if empty all available posts will be used (and it will depend from order and orderby settings)
Testimonials shortcode

[happytestimonials limit="4" orderby="date" width="" place="" exclude_posts='' include_posts='',]
This shortcode will display carousel with testimonials. You need to first add them in WordPress, in Testimonials menu (it's a Custom Post Type) If you want some nicely styled carousel with company logo you can try 'happytestimonials' shortcode.
Options- limit - how many items to display
- orderby - none | ID | author | title | name | date | modified | parent | rand | comment_count
- place - first/last/center/none
- exclude_posts - put ID's of testimonials separated by comma to exclude them from list
- include_posts - put ID's of testimonials, separated by comma to include them in the list, if empty all available posts will be used (and it will depend from order and orderby settings)
Team shortcode

[team limit="4" title="Team" members="" link_to_pages="yes" width_of_single_box="" columns=""]
Team shortcode is used on About Us page - it gives nicely styled boxes to feature team members of your comapny. You need to first add team in WordPress, in Team menu (it's a Custom Post Type)
Options- title - required field
- limit - how many items to display
- members - if you want to show specific members, you can put here ID's separated by the comma
- link_to_pages - set it to "no" if you don't want to link images to single team member site
Columns shortcodes:
Trizzy is based on modified Skeletons grid - Full width page has 16 columns, if it's page with sidebar it has 16 columns. Using columns shortcodes you can build your own layouts.
The important part of columns shortcode except the width is place. You have 3 options here - first, none or last. If last is used, it's assumed that this column is last in current row and floats will be cleared. First will set margin-left to 0px. If you have more than two columns you might want to use also place="center" - it will set margin left and margin right to 0px. It's good to try different parameters to find out what looks the best in specific situation.
[column width="one-third" place="first" ] Put here content [/column] [column width="two-thirds" place="last" ] Put here content[/column]
- width "sixteen" (default), "fifteen", "fourteen", (..), "two", "one"
- place "first" (default), "center", "last", "none"
- custom_class just adds custom class to the container div, handy if you want to style something in different way
You can use other shortcodes in columns.
Tooltip shortcodes:
[tooltip title="" url="" side=""] text [tooltip]
Create tooltip over link, showed on hover.
Options- title
- url
- side top | left | bottom | right
Skillbar shortcode:
It needs to be wrapped with [skillbars] shortcode
[skillbars] [skillbar title="Security" value="90"][skillbar title="HTML / CSS" value="80"][skillbar title="Usability" value="70"][skillbar title="Marketing" value="60"] [/skillbars]
This will show animated horizontal bars that represents levels of your skills

Pricing Tables

Pricing tables are not available currently from TinyMCE editor.
Sample code for Pricing table:
[pricing_table title="Standard" price="9.99" buttonlink="#" per="per month" place="first" ]<ul>
    <li>25 GB Storage</li>
    <li>Free Live Support</li>
    <li>Unlimited Users</li>
    <li>No Time Tracking</li>
    <li>Enhanced SSL Security</li>
</ul>[/pricing_table][pricing_table title="Premium" price="29.99" per="per month" buttonlink="#" type="featured" ]<ul>
    <li>50 GB Storage</li>
    <li>Free Live Support</li>
    <li>Unlimited Users</li>
    <li>No Time Tracking</li>
    <li>Enhanced SSL Security</li>
</ul>[/pricing_table][pricing_table title="Professional" price="69.99" per="per month" buttonlink="#" type="premium"]<ul>
    <li>100 GB Storage</li>
    <li>Free Live Support</li>
    <li>Unlimited Users</li>
    <li>No Time Tracking</li>
    <li>Enhanced SSL Security</li>
</ul>[/pricing_table] [pricing_table title="Ultimate" price="99.99" per="per month" buttonlink="#" place="last"]<ul>
    <li>100 GB Storage</li>
    <li>Free Live Support</li>
    <li>Unlimited Users</li>
    <li>No Time Tracking</li>
    <li>Enhanced SSL Security</li>
</ul>[/pricing_table]
Here's one regular column:
[pricing_table title="Ultimate" price="99.99" color="#514e9f" per="per month" buttonlink="#" place="last" ]<ul>
<li>5 GB Storage</li>
<li>Free Live Support</li>
<li>Unlimited Users</li>
<li>No Time Tracking</li>
<li>Enhanced SSL Security</li>
</ul>
<a href="#">Sign Up</a>[/pricing_table]
Options
- type standard | premium | featured
- title required
- color #f6f6f6 - example color of table
- currency by default $
- price just a number
- per "per month" | "per year" etc
- buttonstyle additional class for button
- buttonlink URL
- buttontext "Sign up" etc
- width "sixteen" (default), "fifteen", "fourteen", (..), "two", "one"
- place "first" (default), "center", "last", "none"
Remember that there shoudn't be any white space between closing and opening tag [/pricing_table][pricing_table]
Toggle
[toggle title=" How much does it cost?"] Perspiciatis unde omnis iste natus error sit voluptatem accusantium doloremque laudantium, totam rem aperiam. Donec ut volutpat metus. Vivamus justo arcu, elementum a sollicitudin pellentesque, tincidunt ac enim. Proin id arcu ut ipsum vestibulum elementum. [/toggle]
- title required
- open set to "yes" to show it open at start, default is "no"
List styles

[list style=1 color="yes"]
  <ul>
    <li> list item </li>
    <li> list item </li>
 </ul>
[/list]
- style 1 | 2 | 3 | 4
- color yes | no
Use it to replace boring list bullets with nice icons
Box shortcode:
[box type=error] Error! Please fill in all the fields required. [/box]
- type "error", "notice", "warning", "success"
Button shortcode:
[button color="green" url="#" icon="icon-ok" iconcolor="white"] Text [/button]
- url link
- color "color" (default), "gray", "dark"
- customcolor "#000000" (any color hash)
- iconcolor "white","black"
- icon Font Awesome icon name
- url
- target "_blank"
- customclass
Tabs shortcode:
[tabgroup] [tab title="Tab 1" icon="icon-star"] Aliquam egestas consectetur elementum class aptent taciti sociosqu ad litora torquent perea conubia nostra lorem inceptos orem ipsum dolor sit amet, consectetur adipiscing elit.[/tab] [tab title="Tab 2"] Lorem ipsum pharetra felis. Aliquam egestas consectetur elementum class aptent taciti sociosqu ad litora torquent perea conubia nostra lorem inceptos orem ipsum dolor sit amet, consectetur adipiscing elit.[/tab] [tab title="Tab 3"] Lorem ipsum pharetra felis. Aliquam egestas consectetur elementum class aptent taciti sociosqu ad litora torquent perea conubia nostra lorem inceptos orem ipsum dolor sit amet, consectetur adipiscing elit. [/tab] [/tabgroup]
You can add icons to tab by using parameter icon. Whole tab section must be in [tabgroup] shortcode.

Accordion shortcode:
It need's to be wrapped with [accordionwrap] shortcode
[accordionwrap] [accordion title="Accordion#1"] Lorem ipsum dolor sit amet, consectetur adipiscing elit tortor libero sodales leo, eget blandit nunc tortor eu nibh. Aenean nisl orci lorem, condiment ultrices consequat eu lorem ipsum dolor sit amet inventore veritatis et quasi architecto beatae vitae dicta sunt explicabo dolor sit amet.[/accordion][accordion title="Accordion#1"] Lorem ipsum dolor sit amet, consectetur adipiscing elit tortor libero sodales leo, eget blandit nunc tortor eu nibh. Aenean nisl orci lorem, [/accordion][accordion title="Accordion#1"] Lorem ipsum dolor sit amet, consectetur adipiscing elit tortor libero sodales leo, eget blandit nunc tortor eu nibh. Aenean nisl orci lorem, [/accordion] [/accordionwrap]
Google maps shortcode
[googlemap width="100%" height="250px" address='New York, United States']
You can display simple google map with address box, if you want something more advanced there are dozens of plugins you could use
Clients shortcode

[clients_carousel]
<ul>
<li><img title="logo_01" src="http://www.demo.purethemes.net/incredible/wp-content/uploads/2012/09/logo_01.png" alt="" width="187" height="95" /></li>
<li><img title="logo_01" src="http://www.demo.purethemes.net/incredible/wp-content/uploads/2012/09/logo_02.png" alt="" width="187" height="95" /></li>
</ul>
[/clients_carousel]
You can display with this shortcode nice list of logo of e.g your partners, just put list of IMG tags in [clients] [/clients].
Options- width "sixteen" (default), "fifteen", "fourteen", (..), "two", "one"
- place "first" (default), "center", "last", "none"
Recent products shortcode:

[trizzy_recent_products per_page="12" orderby="date" order="DESC" category="cars" ids="12,32,40"]
- per_page - how many items to display
- orderby - none | ID | author | title | name | date | modified | parent | rand | comment_count
- order - ASC | DESC
- category - if you want to choose products from specific category
- ids - if you want to choose specific products, just put their ID's separated by comas
Recent products list shortcode:

[trizzy_products_list per_page="4" orderby="date" order="DESC" category="cars" ids="12,32,40" type="featured"]
- title - just title ;)
- type - best_selling, top_rated, featured
- per_page - how many items to display
- orderby - none | ID | author | title | name | date | modified | parent | rand | comment_count
- order - ASC | DESC
- category - if you want to choose products from specific category
- ids - if you want to choose specific products, just put their ID's separated by comas
- order - ASC | DESC
Image caption box shortcode:

[image_caption_box title="Men\'s Shirts" subtitle="25% Off Summer Styles" image="http://imageurl" url="" width="one-third" place="first"]
- title - just title ;)
- subtitle - just subtitle
- image - direct link to image
- url - where box should link
Parallax shortcode:

[parallax background="#000" title="End of season sale" subtitle="Up to 35% off Women’s Denim" image="http://imageurl" height="200" opacity="0.45" custom_class=""]
- title - just title ;)
- subtitle - just subtitle
- image - direct link to image, should be as wide as possible (1920px preffered)
- height - put value smaller then the actuall height of image, so the diffrence will be animated
- opacity opacity value of overlay
- background color of overlay
Latest from box shortcode:

[latest_from_blog]
- limit - number of posts to display
- columns - number of columns to which divide grid
- orderby - none | ID | author | title | name | date | modified | parent | rand | comment_count
- order - ASC | DESC
- categories - if you want to display posts from specifc categories
- tags - if you want to display posts from specifc tags
- exclude_posts - if you want to exclude any specific posts from list, use their ID's after coma
- masonry - enable Isotope
Content box shortcode:

[contentbox width="four" effect="1" place="first" title="Effect #1" icon="bolt" link="#"] Integer ultrices scelerisque nulla fringilla. Praesent leo massa, ullamcorper venenatis tempor. [/contentbox]
- title - required title
- icon - one of Font Awesome icons
- effect - 1 | 2 | 3 | 4
Counter box shortcode:

[counterbox width="four" place="first" title="Happy customers" icon="thumbs-o-up" value="2,147" colored="no"]
- title - required title
- icon - one of Font Awesome icons
- value - animated number
- colored - set to "yes" to use all colored version
Info baner shortcode:

[infobanner title="Perfect Template for Showing Your Products" buttontext="Get This Theme"] Trizzy is a premium template created for ecommerce and business websites [/infobanner]
- title - required title
- url - where should button link
- buttontext - text on the button
Popup shortcode:

[popup title="Modal Popup" buttontext="Open popup"] Trizzy is a premium template created for ecommerce and business websites [/popup]
- title - required title
- buttontext - text on the button
Share it shortcode:

[shareit facebook="yes" pinit="yes" twitter="yes" gplus="yes"]
- facebook - set to "yes" to show button
- pinit - set to "yes" to show button
- twitter - set to "yes" to show button
- gplus - set to "yes" to show button
Basic slider

[slider][slide image="http://themes.loc/trizzy/wp-content/uploads/sites/11/2014/07/service.jpg" caption="The New Way To Success"][/slider]
- image - URL to image
- caption - Text to show
- url - URL of the slide
Widgets
-
Trizzy MailChimp List Signup
Works only if you have installed plugin named 'MailChimp Widget' -
Trizzy Tabbed Widget
Show tabs with popular and recent posts and latest comments
Theme Options
Options panel is based on amazing OptionsTree plugin.
Typography
You can choose from one of 500+ Google fonts. Select font for body and for headers. You can also just choose some nice font for a logo if you prefer to have text logo instead of image.
Sidebars
All sidebars that you create here will appear both in the Appearance > Widgets, and then you can choose them for specific pages or posts. Please choose a unique title for each sidebar and make it one word.
Theme Customizer
Trizzy is using new feature of latest WordPress - Theme Customizer, you'll get there by clicking Appearance - Customize
It gives you real time preview of changes you made to your site.
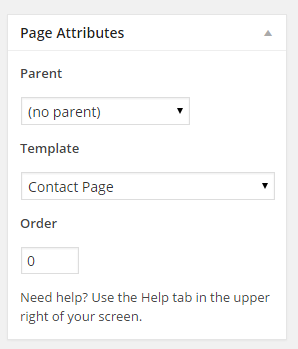
Contact Page
You should use contact form 7 plugin for contact form. After installing it, go to Contact - Add new (or edit current one) and in Form field paste what's below:
<fieldset>
    <div>
        <label>Name:</label> [text* your-name]
    </div>

    <div>
        <label >Email: <span>*</span></label>[email* your-email]
    </div>

    <div>
        <label>Message: <span>*</span></label>[textarea your-message]
    </div>
</fieldset>
[submit "Send"]
Than at the top of page you'll see shortcode, for example:
[contact-form-7 id="503" title="Contact form 1"]Use it on a page you want to have contact form.
In Theme Options -> Contact Page you can setup map. This map will be displayed on any page with Contact Page Template selected

Translation
You can learn from here about Translating theme into your language.
The .pot file is in 'trizzy/languages' folder named 'default.pot'.
You can use Poedit to translate the .po file. You need to save it in languages folder, and name just the same way your
language is defined in WP config file. Open wp-config.php and check define ('WPLANG', '');
if it's for example fr_FR, save your .po file as fr_FR.po
Simple Home Page
Here's example of simple page You can create one by selecting page and in Page Attributes choosing Simple Home Page Template.
In Theme Options -> Simple Home Page Options you can configure that page banner, you can set background, title of the box, and put shortcode for Contact Form.
You should use Contact Form 7, example markup for contact form is:
<fieldset>
    <div>
        [text* your-name placeholder "Name"]
    </div>
    <div>
                [email* your-email placeholder "Email"]
    </div>
    <div>
        [textarea your-message placeholder "Message"]
    </div>
</fieldset>
[submit "Send"]
Once again, thank you so much for purchasing this theme. As I said at the beginning, I'd be glad to help you if you have any questions relating to this theme. No guarantees, but I'll do my best to assist. If you have a more general question relating to the themes on ThemeForest, you might consider visiting the forums and asking your question in the "Item Discussion" section.