CookingPress WP Documentation
Thank you for purchasing my theme. If you have any questions that are beyond the scope of this help file, please feel free to email via my user page contact form here or submit ticket on purethemes.ticksy.com . Thanks so much!
| Author: | Purethemes |
| Created: | 18 February 14 |
| Modified: | 13 February 14 |
| Current Version: | 2.0b |
| Documentation Version | 2.0 |
This documentation in latest version is always available on docs.purethemes.net/cookingpress
Getting started
Upgrade guide for CookingPress 1.x users
Hi! The CookingPress 2.0 was rewritten from scratch - it's absolutly new theme, based on Bootstrap 3.0, compatible with WordPress 3.8 features, and generally, done right, up to current standards.
If you're upgrading from previous version, be aware that you'll loose all the customization you've made to source files, your blog will probably also look different, as theme is now wider, and doesn't provide the same layout versions as previous one.
Don't worry about your recipe data, you won't loose anything from that (ok, you might have some problem with Nutrition facts, but there wasn't any way to save them..
Here are some steps you can take to make upgrade as smooth as possible:
- Make BACKUP! Use on of many plugins for that http://wordpress.org/plugins/search.php?q=backup
- After activating new theme, install this plugin http://wordpress.org/plugins/regenerate-thumbnails/ - thumbnails are a little bit bigger in CP2, so you need to resize them. After activating this plugin, go to Tools -> Regen.Thumbnails, Hit Regenerate button and wait till it ends.
- Go to Appearance -> Customize - here you can change some settings, change layout to boxed, change background, change footer color.
- Upload your logo image in Theme Options -> Header
- Configure slider in Slider settings.
If you'll encounter any problem, please open a private ticket on my support forum http://purethemes.ticksy.com/ with login details to your wp-admin, I'll do my best to help.
Installation
I assume you have your own WordPress installation, so let's get started!
First you need to download theme - check this screenshot from your Downloads page:

Don't forget to select the "Get Notify" checkbox to have always latest updates for CP.
Now you have two options - download the Installable WordPress file or get All files & documentation
(we assume you're reading documentation online, otherwise you've probably downloaded it already :) )
-
Installable WordPress file - Dashboard upload
- Download the “Installable WordPress file only”
- Navigate to Appearance Add New Themes Upload.
- Follow the instructions on the screen, select the downloaded theme file.
- Hit Install Now and the theme will be uploaded and installed.
- Once the theme is uploaded, you need to activate it. Go to Appearance Themes and activate CookingPress.
-
All files & documentation - FTP upload:
- Extract the file you've downlaoded
- Open up your FTP manager and connect to your hosting
- Browse to wp-content/themes
- Upload the cookingpress theme folder.
- Log Into WordPress and go to Appearance - Themes
- Find the CookingPress and click activate
Plugins installation - step I
If installation was successful, you'll see a notice about required plugins for CookingPress, to proceed click "Begin installing plugins"

Plugins installation - step II
You'll see a list of plugins, select them all and choose Install, if everything will go OK, you'll be moved to the Plugins menu in wp-admin, all new plugins should be activated

Activating Theme Options
After activating the theme, you will notice under Appearance menu new sub-menu Theme Options. You'll find there Theme Options Panel, from where you can do a lot of cool stuff. Every section of Theme Options Panel will be described later.

Now open this Options Panel and hit Save button - it will set some options for the start.
Importing Demo Content
If you want to have the same content on your website as Live Preview of CookingPress theme, you'll need to import demo content. To do that please go to Tools Import WordPress, install plugin you'll see and than select file "extras/import.xml".
You'll find it in "All files & documentation"
Just download and extract this file, you'll find the "extras" inside
Notice I'm author of all photos included in theme import file - you're allowed to use them only for testing and demo purpose, you're not allowed to use them for any commercial purpose or on your blog/page.
Setting up the theme settings and plugins
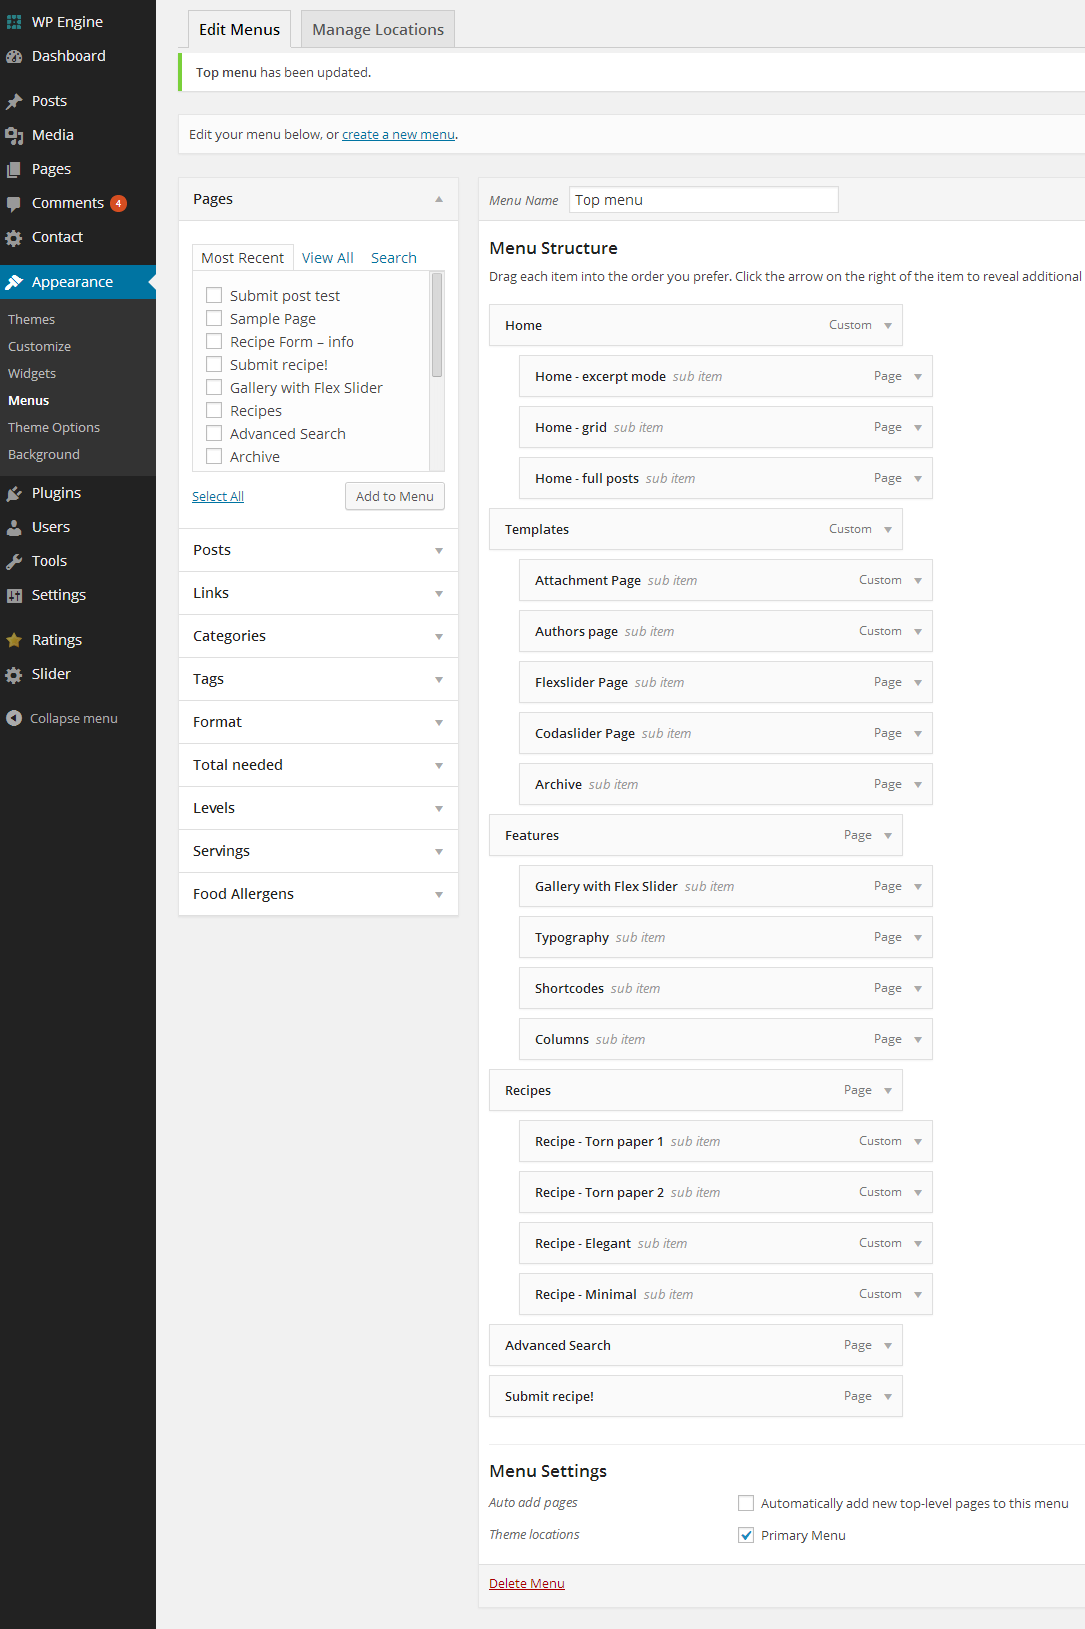
Setting up the basic menu
This theme uses WordPress 3.0 Custom Menus. Go to Appearance > Menus and you will see a panel where you can create new menus. Create one here and select the Primary location for it, click Save and your menu is ready.
Setting up the Print Friendly plugin
This plugin is used to create 'Print' button in Recipe boxes but it needs to be configured properly. Go to wp-admin -> Settings -> Print Friendly & PDF. There are couple sections which needs to be set exactly like described below:
- Pick Your Button Style: Here you can pick button you want, but I reccomend the small grey one.
- Button positioning: Select 'Do not use CSS for button styles'
- Display button on: Add direct to template
- Webmaster Settings: change My Page Content Selected By: to Content Algorithm
Setting up the default background
For now CookingPress 2.0b has only one style (but we will add more) so it's important to set correct background. It should be added automatically but in any case here's how it should look:

Creating Content Recipes, Post and Pages
Recipes
Recipes can be created only if you've installed and activated FoodiePress plugin. By installing this plugin you get new form on posts where you can fill recipe informations. Here's how it should look:
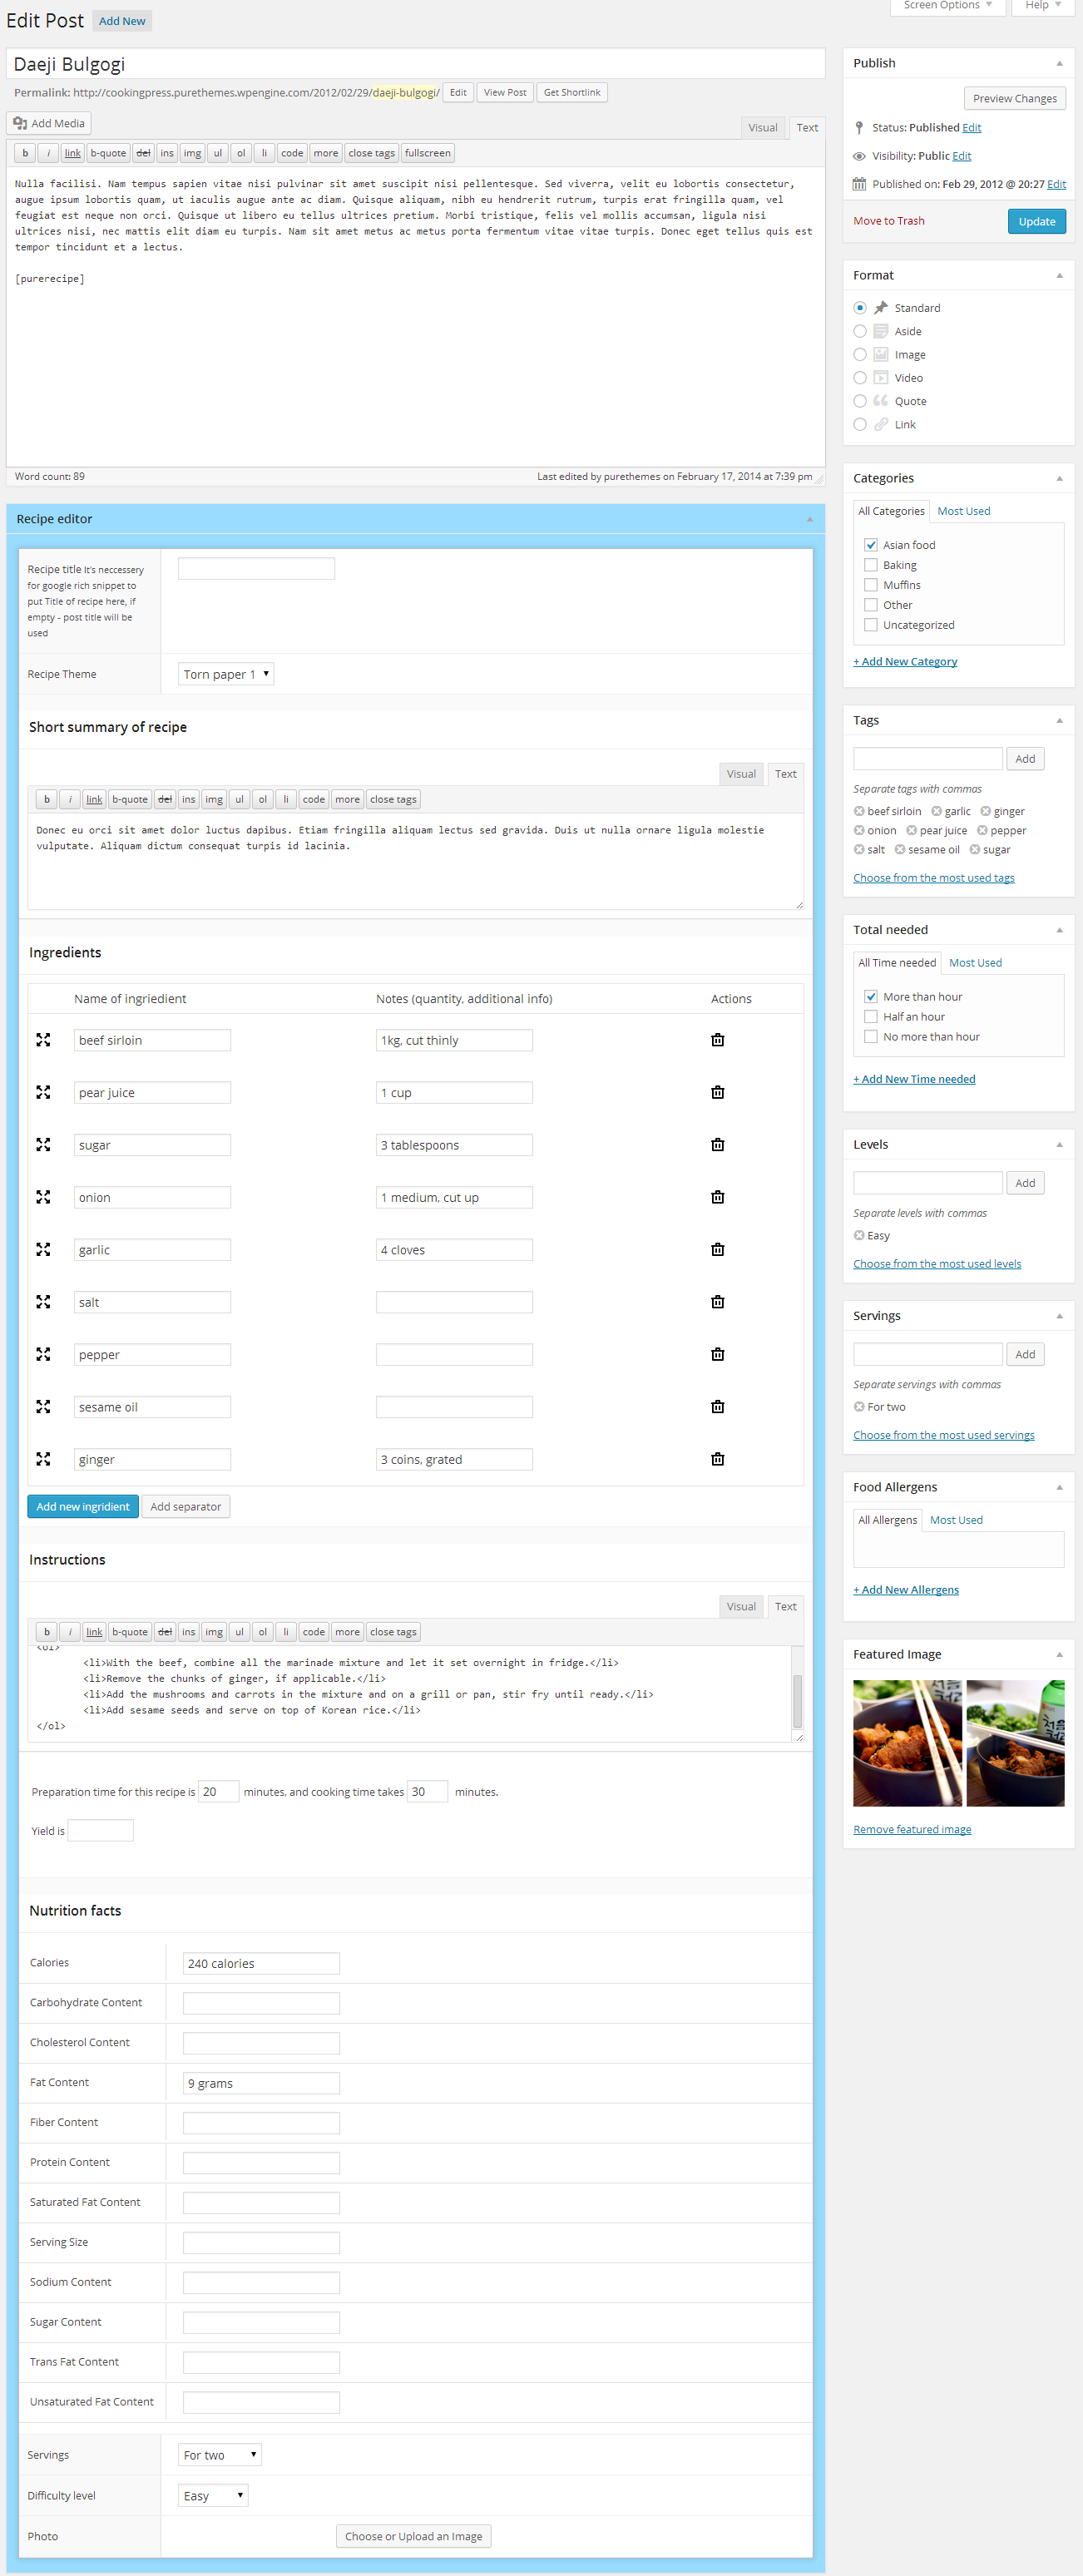
While creating recipe, you need to fill as much information as you know about it, but the basic required is Ingredients and Instructions. Now step by step I'll explain each part.
- Recipe title recipe box is Schema.org compatible and it has to have title - if you won't put it here, the post title will be used
- Recipe theme each recipe box can look different, there are four default recipe templates but it's super easy to create your own if you have basic HTML&CSS knowledge - more about it in Customization section
- Short summary -it's not required but it's good to write something about recipe there, try to make it short!
- Indgrediets - here's important part - by default each ingredients is a Post Tag (this will be changed in future versions of FoodiePress with option to import tags as for new taxonomy - ingredients) This allows you to save them and reuse in next recipes thanks to autocomplete on this fields. Example - if you create post with recipe for chocolate cake, you add 'Dark chocolate' as one of ingredients, which also will be added to tags of this post. When you will create new recipe for different cake, which also requires dark chocolate, just by typing 'choco' you will see suggetsion to use the same ingredient name. Later, this is used to search all recipes by ingredients. You can drag and drop ingredients, and you can add Separator field, if for example you have two-parts recipe
- Instructions preferably step by step list of things to do , but you can easily put there even a video
- Preparation time; Cooking time; Yield first two are quite easy, the Yield is the quantity produced by the recipe (for example, number of people served, number of servings, etc).
- Nutrition Facts- these are not required, and probably won't be used much, but it's still pretty valuable info - the nutrtition lists is also Scheme.org compatible.
- Servings - that is custom taxonomy using to organize recipes by serving size, also part of Schema.org
- Difficulty level - that is custom taxonomy using to organize recipes by how hard they are to do also part of Schema.org
- Photo - it's good when recipe has photo included - if you've added Featured Image to the post, it will be used, if you've added photo here, it will be used instead of Featured Image
Post
Creating posts is nothing special if you have even basic experience with WordPress. CookingPress theme offers couple of additional options in Post editor.

Post types
CookingPress support 3 types of posts. You can change them in right side box. Default is Standard - that one shows only text of post and thumbnail if it has any Featured Image added. The Video post will display video if you'll fill Video URL option, and Gallery type will display gallery you've created in post.
Below Editor you'll see Layout box and Post options box.
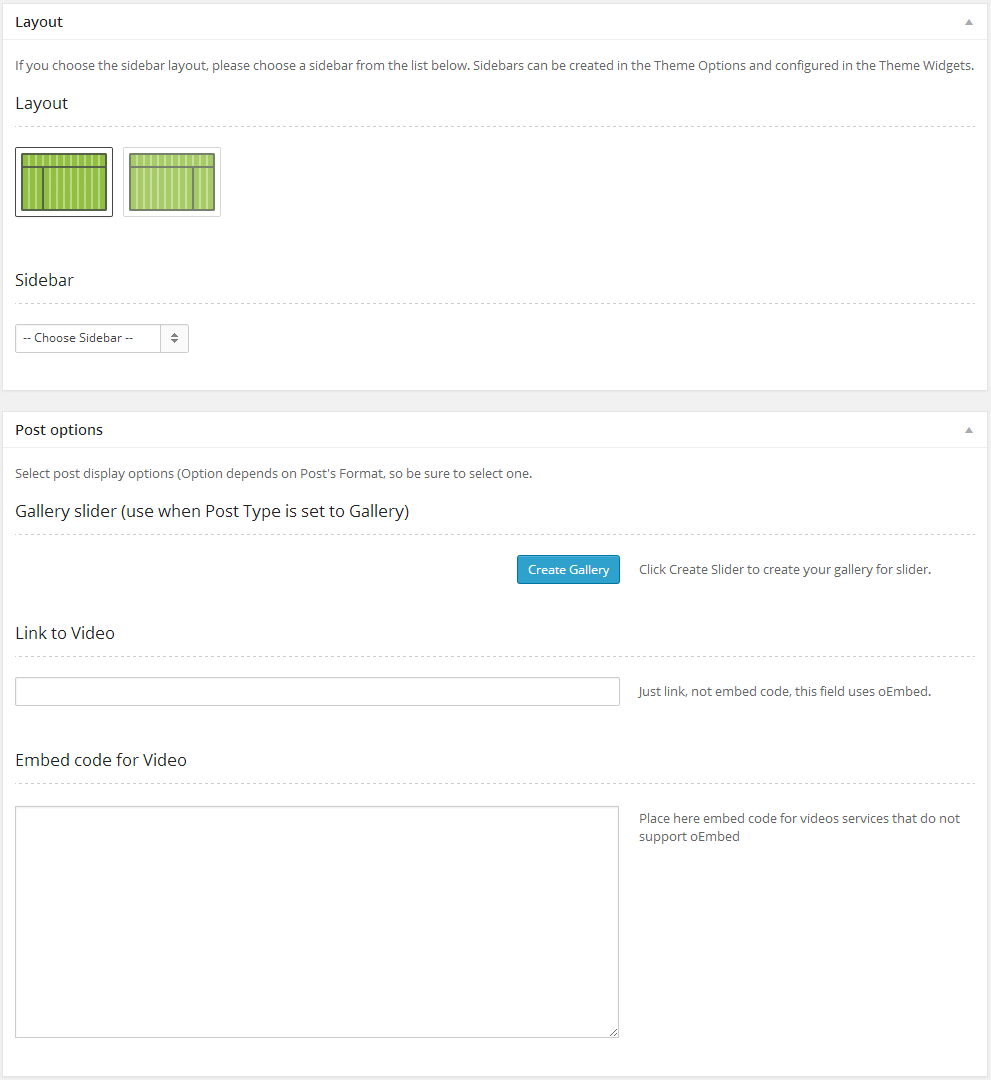
Layout box
Layout box gives you ability to select sidebar to display with post or page, and also select layout of post - you can put sidebar on left or right side, or just show full-width content. Right side is default.
You can create more sidebars in Theme Options in Sidebars section. Just follow instruction there.
Post options
- Gallery slider if you want to use Gallery post type, here is the place to create a gallery. Just click the blue button and select images for your gallery
- Link to Video - if you want to show video at the begining of post, paste here URL to movie (only from those sites: What Sites Can I Embed From?)
- Embed code - if you prefer to use embed code, or your service doesn't support oEmbed, you can put the code here
If you want to use shortcodes in post content, you need to write the excerpt or you might see non parsed shortcodes in search results or in front page.
Pages
pages have the same Layout options and Gallery option. Additionaly you can create slider with pages like on home page and page can be set to Full Width (no sidebar).
You can create more sidebars in Theme Options in Sidebars section. Just follow instruction there.
List of page templates:
| Template name | Description |
|---|---|
| Page with slider | Page with one of the sliders that can be created in wp-admin -> Sliders |
| Grid loop Page | Blog page template |
| Full loop Page | Blog page template |
| Excerpt loop Page | Blog page template |
| Add Recipe by registered user | Page with frontend recipe submision form for registered users |
| Add Recipe by anonymous user | Page with frontend recipe submision form for registered users - not recommended |
| Advanced Search Page | Page with search form where you search recipes by ingredients, serving size, levels of difficulty, etc. |
Slider
Now when you have some posts, you can create slider for homepage! (you can also add them to any other static page)
First, go to wp-admin -> CookingPress Slider, here you will create your slider.
Only posts with Featured Image can be used in slider.
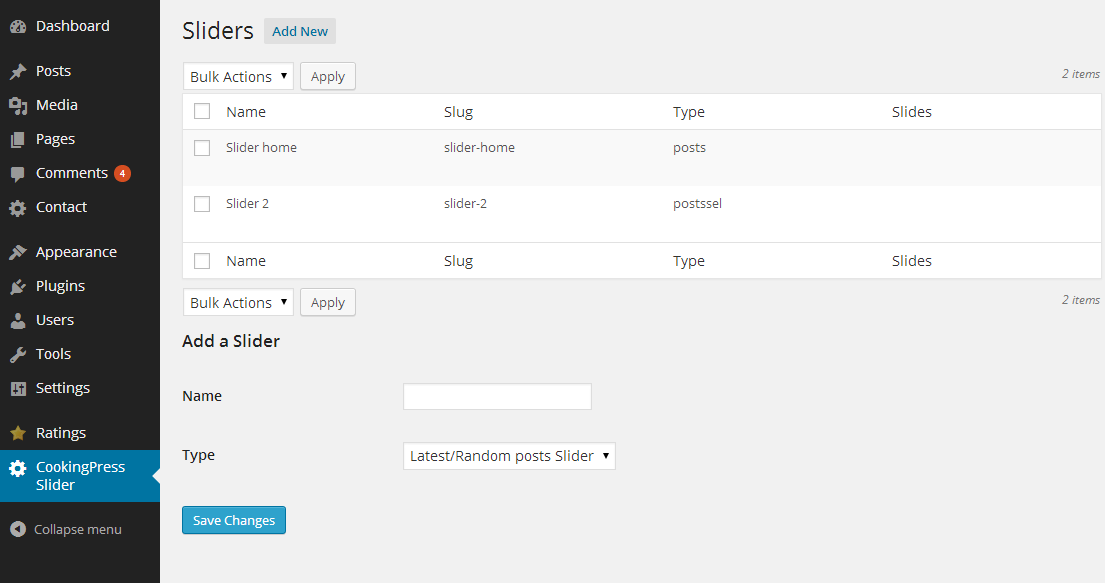
There are two types of sliders - Latest/Random post Slider and Selected Posts Slider
Latest/Random post Slider
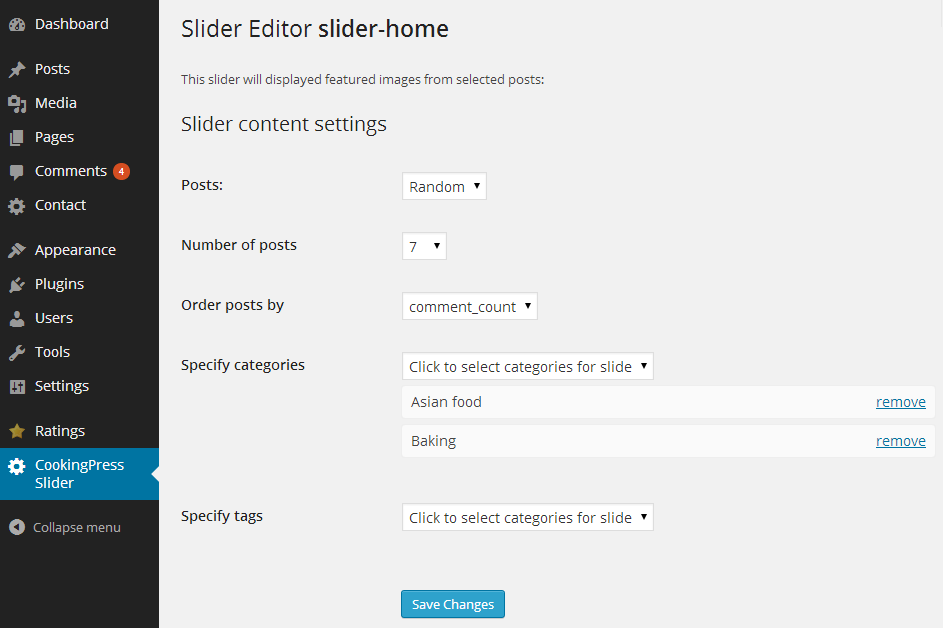
Here you can select from which category or categories should slides be create, you can even choose them by tags, and decide if the group you selected will show only latest posts, or random. If you want select anything, full list of posts will be used. Below are slider settings, which are self-explanatory
Selected Posts Slider
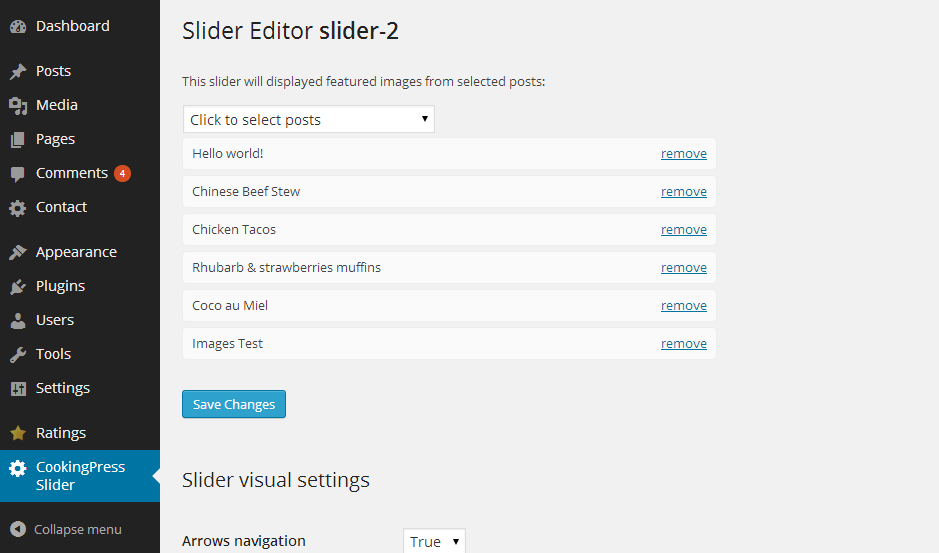
Here you can select each slide post by post, you can drag and drop elements on the list.
After creating you first slider, you need to show it on HomePage, to do it go to Appearance -> Theme Options -> Slider, enable it by switching it to On, and select slider from the list below.
To use slider on page, select Page Template Name: Page with slide, and select slider from the option below Content Editor
Gallery shortcode>
This is special shortcode. It works in 3 ways:
1st way - Select photos:
[puregallery]
You need to add elements to this gallery field under Post Editor:

By clicking Create Gallery, you will see Media Upload box, where you'll be able to select images for the gallery. Then, place in Post content (anywhere you want) shortcode [puregallery] and you'll display slideshow of those images.
2nd way - Include any photos:
[puregallery include="96,113,245"]
In that case, when you'll add attribute include you need to put ID's of each image you want to display in slideshow. This is mainly done for backward compatibility with CookingPress 1.x, but you still can use it. You can put ID of any photo uploaded to Media in wp-admin.
2nd way - Exclude photos:
[puregallery exclude="12,43,56"]
In that case, when you'll add attribute exclude you need to put ID's of each image you want to not display in slideshow, as by default slideshow will show every image uploaded directly to curren post. This won't make sense in CookingPress 2.x, but it's done for backward compatibility with CookingPress 1.x
Shortcodes & Widgets Configuration
CookingPress has some shortcodes which will help you to build awesome layouts.
Here is list of all shortcodes:
Clear shortcode:
[clear]
Empty div with clearfix, use after floated elements
Dropcap shortcode:
[dropcap color=""] A[/dropcap]
Make first letter of paragraph larger than the rest of the text. As "color" you can use also 'gray'.
Accordion shortcode:
It need's to be wrapped with [accordionwrap] shortcode
[accordionwrap] [accordion title="Accordion#1"] Lorem ipsum dolor sit amet, consectetur adipiscing elit tortor libero sodales leo, eget blandit nunc tortor eu nibh. Aenean nisl orci lorem, condiment ultrices consequat eu lorem ipsum dolor sit amet inventore veritatis et quasi architecto beatae vitae dicta sunt explicabo dolor sit amet.[/accordion][accordion title="Accordion#1"] Lorem ipsum dolor sit amet, consectetur adipiscing elit tortor libero sodales leo, eget blandit nunc tortor eu nibh. Aenean nisl orci lorem, [/accordion][accordion title="Accordion#1"] Lorem ipsum dolor sit amet, consectetur adipiscing elit tortor libero sodales leo, eget blandit nunc tortor eu nibh. Aenean nisl orci lorem, [/accordion] [/accordionwrap]
Button shortcode:
[button size="small" color="green" url="#" icon="icon-ok" iconcolor="white"] Text [/button]
- size "medium" (default), "small"
- color "color" (default), "gray", "light"
- customcolor "#000000" (any color hash)
- iconcolor "white","black"
- icon glyphicon name
- url
- target "_blank"
- customclass
Tabs shortcode:
[tabgroup] [tab title="Tab 1" ] Aliquam egestas consectetur elementum class aptent taciti sociosqu ad litora torquent perea conubia nostra lorem inceptos orem ipsum dolor sit amet, consectetur adipiscing elit.[/tab] [tab title="Tab 2"] Lorem ipsum pharetra felis. Aliquam egestas consectetur elementum class aptent taciti sociosqu ad litora torquent perea conubia nostra lorem inceptos orem ipsum dolor sit amet, consectetur adipiscing elit.[/tab] [tab title="Tab 3"] Lorem ipsum pharetra felis. Aliquam egestas consectetur elementum class aptent taciti sociosqu ad litora torquent perea conubia nostra lorem inceptos orem ipsum dolor sit amet, consectetur adipiscing elit. [/tab] [/tabgroup]
Toggle
[toggle title=" How much does it cost?"] Perspiciatis unde omnis iste natus error sit voluptatem accusantium doloremque laudantium, totam rem aperiam. Donec ut volutpat metus. Vivamus justo arcu, elementum a sollicitudin pellentesque, tincidunt ac enim. Proin id arcu ut ipsum vestibulum elementum. [/toggle]
- title required
- open set to "yes" to show it open at start, default is "no"
Highlight shortcodes:
[highlight color=""] text [highlight]
This will highlight wrapped text.
Options- style "color" (default), "gray", "light"
row shortcode:
[row]
You need to wrap your columns in [row] shortcode
Columns shortcodes:
CookingPress is based on Bootstrap 3 grid - Full width page has 12 columns. Here's more about how this grid works getbootstrap.com/css/#grid
a
[column xs="4" sm="4" md="6" lg="11" custom_class="" ] Put here content[/column]
- xs Extra small devices Phones (<768px)
- sm Small devices Tablets (≥768px)
- md Medium devices Desktops (≥992px)
- lgd Large devices Desktops (≥1200px)
- custom_class just adds custom class to the container div, handy if you want to style something in different way
You can use other shortcodes in columns.
List styles
[list type=check]
<ul>
<li> list item </li>
<li> list item </li>
</ul>
[/list]
- type check | arrow | checkbg | arrowbg
Use it to replace boring list bullets with nice icons
Box shortcode:
[box type=error] Error! Please fill in all the fields required. [/box]
- type "error", "notice", "warning", "success"
Widgets
-
CP Share Widget
Share widget -
CP Recent Posts
Displays recent posts with thumbnails
Theme Options
Options panel is based on amazing OptionsTree plugin.
Typography
You can choose from one of 500+ Google fonts. Select font for body and for headers. You can also just choose some nice font for a logo if you prefer to have text logo instead of image.
Sidebars
All sidebars that you create here will appear both in the Appearance > Widgets, and then you can choose them for specific pages or posts. Please choose a unique title for each sidebar and make it one word.
Theme Customizer
CookingPress is using new feature of latest WordPress - Theme Customizer, you'll get there by clicking Appearance - Customize
It gives you real time preview of changes you made to your site.
Recipe templates
There are 4 default layouts in CookingPress:

It's easy to create your ownn templates, let's learn how:
All core templates are stored in wp-content/plugins/foodiepress/public/templates/
To create your template, duplicate the 'minimal' template as it's good place to start, rename it as you want and put to wp-content/uploads/foodiepress/ - this way it won't be removed after update
Inside you'll find file index.tpl, style.css and folder images and partials (partials can be used for repeatable elements, but we probably won't need it)
index.tpl is nothing more than html file, but it contains tags to display dynamic recipe elements.
in style.css keep styles for every elements of the recipe, what's important is to use prefix for each elements with the name of your template. Example: if you've named your template 'Flowers Theme' and folder name is 'flowerstheme', you want to add style for recipe thumbnail, the CSS you'll add will be:
.flowerstheme .recipe-image { padding: 5px; }The templating engine for recipes is Dwoo.org, you can check how to use, it support simple operation and if statement
After creating template you need to add it to list, for this you need to add to your functions.php
function my_own_themes( $array ){
    $array['flowerstheme'] = array(
                'name'=>'Flowers Theme',
                'origin' => 'user'
                );
    return $array;
}
add_filter( 'foodiepress_themes', 'my_own_themes',10);
You need to keep the same names as your templates folder name, if everything went ok, you'll see it on the list of templates in Recipe Editor
Translation
You can learn from here about Translating theme into your language.
Use the en.po file in 'cookingpress/languages' as a base for your tranlsation.
You can use Poedit to translate the .po file. You need to save it in languages folder, and name just the same way your
language is defined in WP config file. Open wp-config.php and check define ('WPLANG', '');
if it's for example fr_FR, save your .po file as fr_FR.po
You need to also translate FoodiePress file the same way as the theme file, it's stored in wp-content/plugins/foodiepress/languages/
You need to translate it from the foodiepress-en.po and save as for example foodiepress-fr_FR.po
Make a backup of your translation as it might be deleted after update!
Once again, thank you so much for purchasing this theme. As I said at the beginning, I'd be glad to help you if you have any questions relating to this theme. No guarantees, but I'll do my best to assist. If you have a more general question relating to the themes on ThemeForest, you might consider visiting the forums and asking your question in the "Item Discussion" section.